Save yourself some time and headaches by creating an “on/off” switch for your process builders, workflow rules and approval processes.
One of my favorite things about process builders is their ability to handle the automation for various business processes, all in an easy to digest format. Gone are the days of having hundreds of workflow rules with names that are only helpful to the admin who created them, and the endless clicks required to determine what they do. However, a key drawback to this efficiency becomes evident when there is a need to turn off some automation contained in a Process Builder for a specific business unit, but it contains automation for many business units like sales, operations, marketing and customer service.
For example, as an admin I am periodically required to disable all automation for marketing while allowing others to conduct large data loads and/or system maintenance, without triggering errors. However, it’s essential to ensure it’s “business as usual” for all other users.
The easiest way to turn off everything related to marketing without having to deactivate each process builder, workflow rule, approval process and validation rule is to create a custom setting that will act as an “on/off” switch for all declarative automation.
What is a custom setting?
Custom settings are objects that exist on the setup side of Salesforce. They are primarily used by developers to store data or logic that can be used in Apex classes or Triggers. There are two flavors of custom settings: list and hierarchy. We can only utilize the hierarchy type for our use case. A hierarchy custom setting is essentially a custom object with custom fields and default relationships at the organization, profile and/or role level.
Check out this document for more information:
*Note: List custom settings are accessible via “visual workflow” and they open up possibilities for declarative functionality where custom code is usually used/required.
Solution:
Use a “hierarchical custom setting” to control the behavior of the automation rules.
Step 1: Create a custom setting
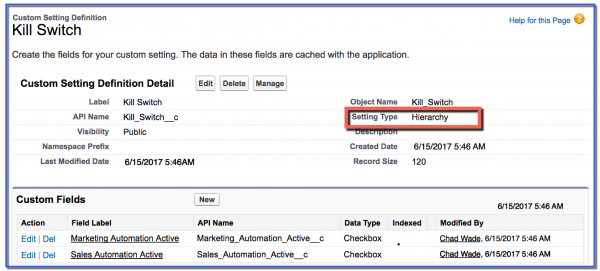
Create and label a hierarchy custom setting (I like to use the label “kill switch”). Add some fields by clicking the “new” button under the custom fields section. Create a checkbox field for each process or function that you want to control.
Example: Checkbox – Marketing Automation Active
Go to Setup > Develop > Custom Setting and click New (make sure the setting type is “hierarchy”). Clicking save will take you to “Custom Setting Definition” page where you can add custom fields.
Step 2: Add custom setting criteria to your process builder
The next step is to update the evaluation criteria in your process builders, workflow rules, approval processes and/or validation rules to take advantage of the custom setting.
In our case, the formula is $Setup.Kill_Switch__C.Marketing_Automation_Active__c = True.
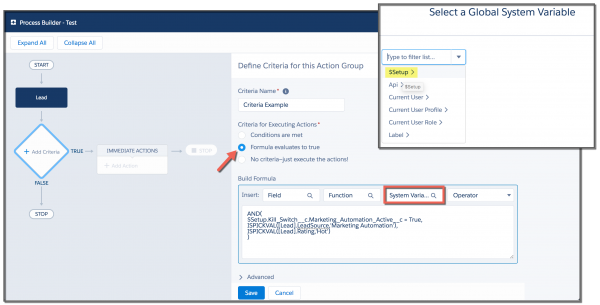
*Note: You can only access “custom settings” in formulas. This can be found by clicking on “system variables for process builder.” For workflow rules, approval processes and validation rules, you can access the custom settings by clicking on “insert field”. Custom settings show up on the left side and look like: $Setup.Custom_Setting_Name__c.
Step 3: Complete custom setting record
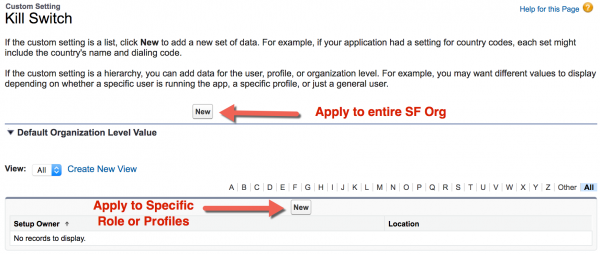
Navigate back to “custom setting” and click the “manage” button to complete the setup of the “Kill Switch”.
Setup > Custom Settings > Kill Switch > Click Manage
To apply the “kill switch” to all users in your Salesforce organization:
Click the “new” button at the top of the page and create a record at the “default/organization” level.
Create multiple records (one per profile or role) if you want to selectively apply this logic based on “profile” or “role.”
You’ll see a standard edit page with the fields you created for each of the processes you wanted to control.

Check the boxes for “marketing” and “sales,” and then click save.
*Note: “Location” is blank because this entry applies to the Salesforce organization as a whole. If you are able to enter a “role” or “profile” for the location field, you clicked on the wrong “new” button.
Step 4: Testing
Assuming there are no external issues and you remembered to “activate” your process builder (I’m famous for forgetting that), your process builder will perform normally.
Go ahead and give it a test, I’ll wait.
Great, the process does what it did before we started so what was the point of all that setup?
This is where the real fun begins, (yes, I find this fun and proudly wear my Salesforce “nerd” badge). Navigate to your “kill switch” custom setting, click “manage” and uncheck one of the fields.
Run the test again and you will see that the node on the process builder won’t execute.
Summary
You can now turn off specific nodes within a process builder, workflow rules, approval processes and validation rules simply by using a”kill switch” custom setting. The real power becomes evident when you realize that you can turn any combination of these automations off with the flick of a switch (or unchecking of a box).